
In this Tutorial we are using AJAX Control Toolkit , Webservice and XML Schema With DataSet Classes to perform CascadingDropDown.The CascadingDropDown
control in the AJAX Control Toolkit extends a DropDownList control so
that changes in one DropDownList loads associated values in another
DropDownList. Here we are using Three CascadingDropDown Extenders.
Attributes are following for CascadingDropDown extenders:
ADO.NET typed datasets are classes that are generated from XML Schemas (.xsd file). As changes are made to the schema file the definition of the dataset class changes as well. When working with XML Schemas and typed dataset representations in Visual Studio at design time there is essentially no difference. They are both .xsd files in the XML Designer, the difference being that typed datasets have an associated class file and a predefined document (or root) node that represents the encompassing dataset.
Step 1:
Attributes are following for CascadingDropDown extenders:
ServicePath: URL of a web service delivering the list entries
ServiceMethod: Web method delivering the list entries
 TargetControlID: ID of the dropdown list
Category: Category information that is submitted to the web method when called
PromptText: Text displayed when asynchronously loading list data from the server
ParentControlID: (optional) parent dropdown list that triggers loading of the current list
ServiceMethod: Web method delivering the list entries
TargetControlID: ID of the dropdown listCategory: Category information that is submitted to the web method when called
PromptText: Text displayed when asynchronously loading list data from the server
ParentControlID: (optional) parent dropdown list that triggers loading of the current list
ADO.NET typed datasets are classes that are generated from XML Schemas (.xsd file). As changes are made to the schema file the definition of the dataset class changes as well. When working with XML Schemas and typed dataset representations in Visual Studio at design time there is essentially no difference. They are both .xsd files in the XML Designer, the difference being that typed datasets have an associated class file and a predefined document (or root) node that represents the encompassing dataset.
Step 1:
MSVS2008->New->Website(validationControls)

Step2:
Add database to it and create table in database named it Cars.
Cars Table:

Step 3:
Right click over website name and click on Add New Item(WebService.asmx)

Step 4:
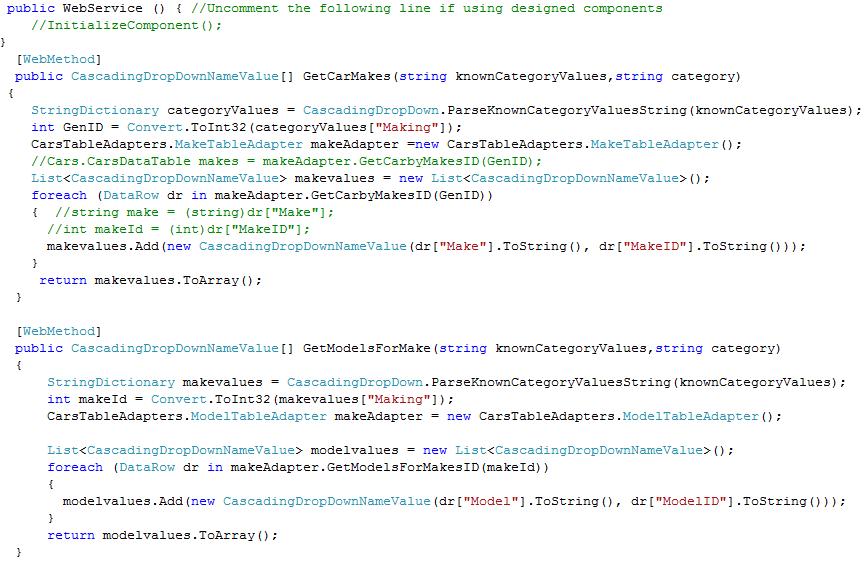
WebService.cs page code
(Click on Image to enlarge it)

Step 5:
Default.aspx page code
In
order to activate the functionality of ASP.NET AJAX and the Control
Toolkit, the ScriptManager control must be put anywhere on the page (but
within the <body> element)
(Click on Image to enlarge it)

Step 6:
Right click over App_Code and click on Add New Item (DataSet.xsd)
give it to name Cars.xsd

Double click Cars.xsd

Right Click over opened space and select TableAdapter.

Step 7:
After clicking TableAdapter this Wizard will open up
Click on Next Button

Step 8:
Select use SQL statements by click on radio button.After that click on Next Button.

Step 9:
Enter particular SQl statement in this step. As i have used select sql command.
click on next button.

Step 10:
Uncheck Fill Data Table and give method name under return a DataTable(eg. GetCarbyMakesID)
click on next button.

Step 11:
This is a final window, click on Finish button.

Step 12:
By using same above process create other data table adapter.
You can reconfigure it by right clicking on already created methods and by selecting configure.

View in Browser:


No comments:
Post a Comment