Showing posts with label Blogging. Show all posts

Monday, July 7, 2014

How to make or divide header of Blog into two parts and fill the space with AdSense Ads

As you will see while we make a search on Internet that most of Blogger want to put their AdSense Ads on the top of their Blogs. So here we can learn that how it is possible to make it happen on your own blog and below are the step by step instructions which you can follow for your blog's header to divide it into two parts.

Step 1: Login to your Blogger Account.

Step 2: Go to your blogger dashboard -- > Template --> Edit HTML

Before you make the changes take backup of your blog

Step 3: Click on the Code and Press CTRL+F to find out below code. Put  <a expr:href='data:blog.homepageUrl'><data:title/></a> in the box and press ENTER.

Step 4: Put this code in the middle of </b:section> and </div>
 <b:section id='header-right' showaddelement='yes'/>  
 <div style='clear: both;'/>  

The final code will be like this:

Step 5: The other task is to place the AdSense Ad on the right side. So we will do rest of this work using CSS.
Copy the following code and place it before/above ]]></b:skin>
 #header, body#layout #header {width:15%;display:inline-block;float:left;}  
 #header-right, body#layout #header-right {width:75%;display:inline-block;float:right;padding:10px;}  
 #header-right .widget {margin:0;}  

The final code will be like this:
Note : You have to adjust both the width and padding according to your blog or site.

Step 6: Checkout your Layout Structure and choose AdSense Ads as your gadget.

 Click on Save arrangement and you are done.

Related Topics:

Hiding/ Removing/ Reducing space above blogger header or logo

If you have already gone through removing Navbar space from blogger than you will be able to see some extra space left above header which is of no use. So here is a way by which you can hide or remove it.

Step 1. Log in to your blogger account
Step 2. Go to Template then Click Edit HTML and then Proceed.
Step 3. Using Ctrl+F look for </head> tag.
Step 4. Now add the following code just above the </head> tag.
 <style type='text/css'>  
           .content-inner  
           {  
           margin-top: -50px !important;  
           }  
 </style>  

Your code will be look like this on Edit HTML
Click on Save template and you are done.

Tuesday, May 13, 2014

How to Block or Remove and Unblock Follower from your Google's Blog

When you block a follower of your blog, the user will no longer appear in the Followers Gadget on your blog and will not see your blog in their Blogger Reading List. However, since your blog is public, the user can still use the other feed readers to subscribe to your blog, read your posts, and comment.
Step 1 : Go to Your Blog's Dashboard and click on Followers count.
Step 2: Click on Followers image whom you want to Block.
Step 3: Click Block this user link.
Step 4 : Click on Block Button to Block the Follower.

Step 5 : You can also Unblock Follower by clicking on Unblock link.

If you want to see all your Blocked Members then you have to click on "Show blocked members" link.
It is a link by which you can see in Step 2

Wednesday, January 15, 2014

How to delete or remove and see the titles of recently deleted your Google's Blog


Step 1: Sign in to "www.blogger.com" and click on your blog to reach Blogger Dashboard.
Step 2: Select Settings ⇨ Other (on the left side of the page).
Step 3: Inside Blog Tools, Click on Delete Blog.
Step 4: Click on Delete This Blog.

Note: The title of the deleted blog will appear in the "Deleted blogs" section for a short time after you delete your blog. During this time period, you can click Deleted blogs on the left side of your Blogger Dashboard to see the titles of your recently deleted blogs.

Thursday, August 15, 2013

How to Add or Remove (Stop Following) blog(s) from your Blogger's Reading List

With the Blogger Reading List, you can read all of the latest posts from your favorite blogs right on your Blogger Dashboard. You can add and remove your favorite blog(s) by following easy steps with pictures.

Steps to Add Blog(s) to Reading List

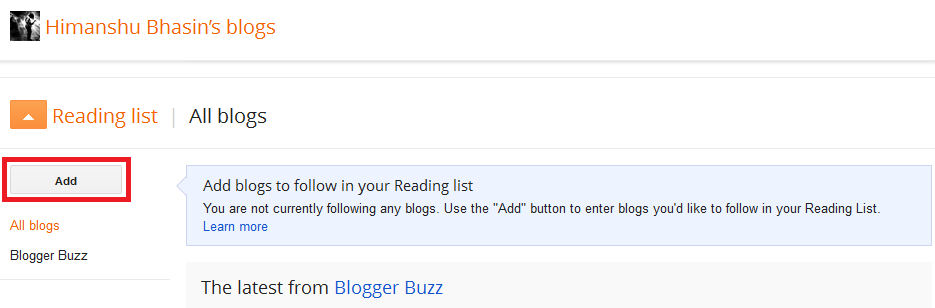
Step 1: Below to your Blogger Dashboard, you can see Reading List. Click on Add button to Add blog(s) on your reading list.
Step 2: Enter Blog url your want to follow or you can follow multiple blogs at once using +Add link to Add more than one blog url.
Select one of the following option from "Follow Publicly" or "Follow Anonymously". After all this click on Follow button.

Now you can see updates from blog(s) you had followed.

Steps to Remove or Stop Following Blog(s) from Reading List

Step 1: To remove blog(s) from your Reading List, click on the gear icon(Manage Reading List) to the right side of "Reading list", on your dashboard.
Step 2: Now you'll be able to see, "Manage Blogs I'm Following", Click on Settings
Step 3: When you click on "Settings", In the popup window select "Google" then you may have to login again.
Step 4: If popup window get closed then again click on "Settings".
In the popup window for the correct title, you'll find the Basics tab selected, with your profile displayed.
Below your profile, you'll see the title of the blog you want to Remove and to the right of that blog, you'll find the link "Stop following this site". Click on the link.

Step 5: Click "Stop Following" to confirm, and the Task is Completed.

Saturday, April 13, 2013

How to Change/Customize/Handle Page specific Title of a page in Blogger

When you visits any page of your blog you can see that page Title remains same on every page that is the Title of your Blog which is default set by blogger.
So with the help of this tutorial you can change this default setting and can show page specific Title on your blog.

Step 1: Goto Template and click on Edit Html

Step 2:Search following code in html template
 <title><data:blog.pageTitle/></title>  

Step 3:Replace searched code with following code
 <b:if cond='data:blog.pageType == &quot;index&quot;'>  
 <title><data:blog.title/></title>  
 <b:else/>  
 <title><data:blog.pageName/> : <data:blog.title/></title>  
 </b:if>  
or  with this code
 <b:if cond='data:blog.pageType == &quot;index&quot;'>  
 <title><data:blog.title/></title>  
 <b:else/>  
 <title><data:blog.pageName/></title>  
 </b:if>  

Step 4: Click Save template and you are done with it.
to check it....view any of your previous post

Friday, February 22, 2013

How to Backup/Restore and Upload yours blogger template

Step 1: Go to Template of your blog and click on Backup/Restore on upper right corner as shown in screenshot

Step 2: Click on Download full template. If you want to change your template or want to restore previous saved one then just you need to upload your template using Browse.
Step 3: click on ok button to save your blog's template which has .xml as file extension.

Monday, February 18, 2013

How to Remove/Manage "Powered by Blogger" Attribution Widget/Gadget from your Blog using Template edit html


Step 1: Go to your blog's Template and click on edit html.

Step 2: Search following code in your blog code and to make your search easy use id that is Attribution to search whole code.

 <b:section class='foot' id='footer-3' showaddelement='no'>  
 <b:widget id='Attribution1' locked='true' title='' type='Attribution'/>  
 </b:section>  

Step 3: Now Replace your above code with the following code.(Also make a backup of your template before any change in your html code)

 <b:section class='foot' id='footer-3' showaddelement='yes'>  
 <b:widget id='Attribution1' locked='false' title='' type='Attribution'/>  
 </b:section>  

Changes that we have made in our code. with the help of these changed red boxes values we can remove Attribution widget.


Now Click on Save template and then close it.


Step 4: Go to Layout and click on Edit of Attribution Gadget and in Configure Attribution window click on Remove to remove it. (this Remove option was not available before)

Now click on save arrangement and enjoy your blog.

Friday, February 15, 2013

How to make a welcome page for your blog home page

In this tutorial you are going to learn about how to set a welcome page instead of your default home page.

Step 1: Go to Settings-> Post and comments

Step 2: In Posts and comments, set Show at most to 0 posts.

Step 3: Click on Save settings on right upper corner.

Step 4: Go to pages of your blog and create a new Blank page.

Create a New Blank page and named it welcome.

Step 5: Go to Settings->Search preferences

put the values in custom redirects as shown below. put "/" in 'From' and "/p/welcome.html" in 'To' and also check Permanent check-box. Value of 'To' can be changed according to your page link.


click on save.


click on Save changes.

Output:

Monday, February 11, 2013

How to set Popular Post widget as a home page for your blog

If Popular Post widget is already added by you into your blog then go to Layout and Remove it.Then go for the following Steps.
 
Step 1: Go to Template of your Blog
Step 2: Click on Edit HTML
Step 3: Search below code
  <b:section class='main' id='main' showaddelement='no'>  

Step 4: Put this code above step 3 code as shown below
 <b:if cond='data:blog.url == data:blog.homepageUrl'>  
 <b:section class='tabs' id='crosscol1' maxwidgets='1' showaddelement='yes'>  
 <b:widget id='PopularPosts1' locked='false' title='Popular Posts' type='PopularPosts'/>  
 </b:section>  
 </b:if>  

Above Code Screenshot within red rectangle

Step 5: Put below code as shown in below Screenshot's red rectangle.
 <b:if cond='data:blog.url != data:blog.homepageUrl'>  
 <!--MAIN SECTION-->  
 </b:if>  

Screenshot

Click on "Save template" button and when it get saved then click on "Close" button 

Output: 
goto home page of your blog

Monday, February 4, 2013

How to create more than 20 pages with blogger

Suppose you already have 20 pages and you want to create 10 more pages then just follow below steps and you will find yourself done with it.

Step 1: Go to Pages and you already have 20 pages.

Step 2: Start with one page, click on Edit and copy its URL from Address bar then paste it some safe area like notepad,word file etc. and click on Update on your blog page.

Step 3: Then delete this page by click on Delete and before delete keep your page data safe(if exists).

Step 4: Now Repeat Step 2 and Step 3 to delete all 10 pages to add extra 10 pages.

Step 5: Now if you have been through all above steps carefully then you have deleted 10 pages and you have 10 unique URLs of your 10 pages.
Now add 10 more pages by normal way.

Step 6:Now you have 20 pages and its time to recover your 10 deleted pages. so now paste your saved URL of a page on address bar and reload page URL.
then click on publish or update button. Do it with all remaining URLs and when you are done with it then click on pages tab and there will be 30 pages in total.

Wednesday, January 9, 2013

How to Remove/Hide blogger posts Date,Time or Author(Posted by) etc.


It is very easy to hide or remove Date, Time or Author(Posted by) etc. from your blogger posts

Step 1: Go to Layout of Your blog
Step 2: Make a click on Edit link present on Blog Posts Box


Step 3: After you click on Edit, Configure Blog Posts pop up window will generate whose snapshot you can see below.

Whatever Information you want to show on your blogger posts, you can enable or disable that information by selecting or deselecting checkbox.


Sunday, November 4, 2012

How to Create,Edit and Remove Labels in Your Blog


Step 1:Create Label
goto posts then click on checkbox of the post for which you want to create label.
Then in Dropdownlist click on New Label.

Then Give Name to Your Selected Post label

Step 2: Edit Label
Click on Edit link of a post whose label you want to Edit.
On Right side of your Post Compose Page, Goto Post Settings click on Labels
Change Label Name From Example Label 1 to Example Label 2  and then click on Done.
and Update Your Post.
You can also choose any other already created label here.

Step 3:Remove Label
Again Click on Edit link of a post whose label you want to Remove.
On Right side of your Post Compose Page, Goto Post Settings click on Labels
and then Remove name and click Done and Update your Post.

Friday, November 2, 2012

How to Remove Navbar from Your Blog by using 3 different easy ways


Method 1:
Step 1: goto Layout of your Blog and click on Edit of Navbar present on right upper corner.
Step 2: on pop up window that is Navbar Configuration select off radio button and click on save button.

Method 2:
Step 1: goto Template click on Edit Html button and then click on Proceed.
Step 2: Whether you are using Chrome or Firefox press F3 and make a search type navbar and replace your navbar code with this code
 #navbar-iframe
 {
   display: none !important;
}
then click on Save Template.
which is also shown with blue background in the image


Method 3:
Step 1: Goto Template->click on Customize button
Then you'll able to see Blogger Template Designer.
Step 2: Then in Blogger Template Designer goto Advanced tab and click on Add CSS tab.
and then search for navbar code already present there and Replace that code with following code.
and if navbar code not already present there then copy below code and paste there.
 #navbar-iframe
 {
   display: none !important;
}
Then click on Apply to Blog button.


Also Read How to Create,Edit and Remove Labels in Your Blog
Also Read Show Twitter following Button on your blog

Popular Posts