Showing posts with label Ajax. Show all posts

Saturday, May 4, 2013

AJAX validation using Struts2 Framework and XML file with Eclipse Indigo

In this tutorial we are performing Server Side Validation using AJAX validation which will lead to the page to show validation errors without reloading the page.
To perform AJAX Validation we need to use  Struts2-dojo-plugin jar in our project.

so firstly download all Required Jars Without dojo-plugin

Download only Struts2-dojo-plugin-2.3.8.jar if you have already downloaded other jars from previous tutorials
or you can also download source code which is available in the end of this tutorial that contains all jars(with dojo-plugin) including source code


Project Structure in Project Explorer:
reg_form.jsp
create a user input page. 
To work with AJAX, <sx:head> must be in the page. Don't use validate="true" in the form tag because it invokes client side validation(Javascript) before Server Side Validation(AJAX validation) but use validate="true" in the submit tag to perform AJAX validation.
 <%@ page language="java" contentType="text/html; charset=ISO-8859-1"  
      pageEncoding="ISO-8859-1"%>  
      <%@ taglib prefix="s" uri="/struts-tags"%>  
      <%@ taglib prefix="sx" uri="/struts-dojo-tags" %>  
      <!DOCTYPE html PUBLIC "-//W3C//DTD HTML 4.01 Transitional//EN" "http://www.w3.org/TR/html4/loose.dtd">  
 <html>  
 <head>  
 <meta http-equiv="Content-Type" content="text/html; charset=ISO-8859-1">  
 <title>Ajax-Registration-form</title>  
 <sx:head />  
 </head>  
 <body bgcolor="skyblue">  
      <h1>Ajax Registration Form</h1>  
      <hr>  
                  <s:form action="register.action" method="post" >  
            <s:textfield name="Name" label="Name" size="20" />  
            <s:radio name="Gender" label="Gender" list="{'Male', 'Female'}" />  
            <s:select name="Course" label="Course" list="{'Select-Option','B.Tech', 'MCA', 'MSC'}" />  
            <sx:submit align="center" validate="true" />  
         </s:form>  
 </body>  
 </html>  

success.jsp
create a user's success page.
 <%@ page language="java" contentType="text/html; charset=ISO-8859-1"  
   pageEncoding="ISO-8859-1"%>  
   <%@ taglib prefix="s" uri="/struts-tags"%>  
 <!DOCTYPE html PUBLIC "-//W3C//DTD HTML 4.01 Transitional//EN" "http://www.w3.org/TR/html4/loose.dtd">  
 <html>  
 <head>  
 <meta http-equiv="Content-Type" content="text/html; charset=ISO-8859-1">  
 <title>success</title>  
 </head>  
 <body bgcolor="lightblue">  
 <center><h3>  
 Hello! <s:property value="name"/></h3></center>  
 </body>  
 </html>  

ContactAction.java
create a Action java class.
 package in.blog.webideaworld;  
 import com.opensymphony.xwork2.ActionSupport;  
 @SuppressWarnings("serial")  
 public class ContactAction extends ActionSupport {  
      private String name;  
      private String gender;  
      private String course;  
      public String getName() {  
           return name;  
      }  
      public void setName(String name) {  
           this.name = name;  
      }  
      public String getGender() {  
           return gender;  
      }  
      public void setGender(String gender) {  
           this.gender = gender;  
      }  
      public String getCourse() {  
           return course;  
      }  
      public void setCourse(String course) {  
           this.course = course;  
      }  
      public String execute() throws Exception{  
           return SUCCESS;  
      }  
 }  

ContactAction-validation.xml
Create validators in XML file and the format for the validatiors xml file is <ActionClassName>-validation.xml
 <!DOCTYPE validators PUBLIC "-//Apache Struts//XWork Validator 1.0.3//EN"  
           "http://struts.apache.org/dtds/xwork-validator-1.0.3.dtd">  
 <validators>  
      <field name="Name">  
           <field-validator type="requiredstring">  
                <message>Name is Required.</message>  
           </field-validator>  
           <field-validator type="regex">  
       <param name="expression">[a-zA-Z]{2,20}</param>  
       <message>Please enter valid name.</message>  
     </field-validator>  
      </field>  
      <field name="Gender">  
           <field-validator type="requiredstring">  
                <message>Gender is Required.</message>  
           </field-validator>  
      </field>  
      <field name="Course">  
           <field-validator type="regex">  
       <param name="expression">B.Tech|MCA|MSC</param>  
       <message>Course is required.</message>  
     </field-validator>  
      </field>  
 </validators>  

struts.xml
set result name="success" for success.jsp and name="input" for reg_form.jsp for validation messages to show up on input page.
 <?xml version="1.0" encoding="UTF-8"?>  
 <!DOCTYPE struts PUBLIC  
   "-//Apache Software Foundation//DTD Struts Configuration 2.0//EN"  
   "http://struts.apache.org/dtds/struts-2.0.dtd">  
   <struts>   
   <package name="default" namespace="/" extends="struts-default">  
     <action name="register" class="in.blog.webideaworld.ContactAction" method="execute" >  
     <result name="success">success.jsp</result>  
     <result name="input">reg_form.jsp</result>  
     </action>  
   </package>  
   </struts>  

web.xml
 <?xml version="1.0" encoding="UTF-8"?>  
 <web-app xmlns:xsi="http://www.w3.org/2001/XMLSchema-instance" xmlns="http://java.sun.com/xml/ns/javaee" xmlns:web="http://java.sun.com/xml/ns/javaee/web-app_2_5.xsd" xsi:schemaLocation="http://java.sun.com/xml/ns/javaee http://java.sun.com/xml/ns/javaee/web-app_2_5.xsd" id="WebApp_ID" version="2.5">  
  <display-name>Struts2_Ajax_Validate</display-name>  
  <welcome-file-list>  
     <welcome-file>reg_form.jsp</welcome-file>  
  </welcome-file-list>  
  <filter>  
    <filter-name>struts2</filter-name>  
    <filter-class>  
      org.apache.struts2.dispatcher.FilterDispatcher  
    </filter-class>  
   </filter>  
   <filter-mapping>  
    <filter-name>struts2</filter-name>  
    <url-pattern>/*</url-pattern>  
   </filter-mapping>  
 </web-app>  

Download Code

View in Browser: 


Registration form:

checking validation without input values:


success page:

Sunday, December 25, 2011

How to use ListSearchExtender on ListBox and DropDownList with AjaxControlToolkit


In this Tutorial we are performing Search for the Items available in ListBox and DropDownList by typing. The extender performs an incremental search within the ListBox based on what has been typed so far.

ListSearchExtender Issues:
In Safari Browser the ListSearchExtender only works with ListBoxes, not DropDownLists.
In Opera Browser the backspace key moves back a page in the browser history by default when it is pressed on a ListBox or DropDownList. To change this behavior you can go to Tools|Preferences|Shortcuts, edit the Keyboard setup, search for “back” and change the mapping for “Platform Windows-Unix-MCE, Backspace” to “Backspace” instead of “Backspace | Back”


In this Tutorial we are setting up values from database table into DropDownList and ListBox present on aspx page using SqlDataAdapter and DataSet.

SqlDataAdapter Represents a set of data commands and a database connection that are used to fill the DataSet and update a SQL Server database.

DataSet is a collection of data. Most commonly a dataset corresponds to the contents of a single database table, or a single statistical data matrix, where each column of the table represents a particular variable, and each row corresponds to a given member of the dataset in question.

Step1:  File->New->Website


Step 2: Create Database named Database.mdf
Create Table Named States under Tables.

States Table:

Step 3:  
aspx page code split view :

Step 4:
aspx.cs page code
Remember to write SqlConnection in one line otherwise it can show error.


OUTPUT:
View in Browser:


Tuesday, November 15, 2011

How to work with AJAX UpdateProgress and UpdatePanel


In this Tutorial we are working with multiple Image Loading using  UpdateProgress and UpdatePanel. We are Showing Loading Images using UpdateProgress tag on Button Click which is in UpdatePanel.

For downloading GIF Loading images Click Here

UpdateProgress : Provides visual feedback in the browser when the content of UpdatePanel controls is updated.

UpdatePanel : Specifies parts of a Web page that can participate in partial-page updates. 

ScriptManager : Manages partial-page rendering. The ScriptManager control registers script components to send to the browser and overrides page rendering so that only specified regions of the page are rendered. 

One UpdateProgress control on the page can show a progress message for all UpdatePanel controls on the page. Asynchronous postbacks originating inside an UpdatePanel control cause the UpdateProgress control to display its message. Postbacks from controls that are triggers for the panel also display the message.

progress.aspx page code:
Click on Image to Enlarge

 progress.aspx.cs page code: 

Click on Image to Enlarge

Here i have used Thread.Sleep() function for delay in postback so that progress view can be clearly seen.

void Thread.Sleep ( int millisecondsTimeout )
The number of milliseconds for which the thread is blocked. Specify zero(0) to indicate that this thread should be suspected to allow other waiting threads to execute. Specify System.Threading.Timeout.Infinite to block the thread indefinitely.

View in Browser:

Monday, November 14, 2011

How to use CalendarExtender with ASP.NET AJAX Control Toolkit


In this Tutorial we are using AJAX Control Toolkit to link CalendarExtender to a Textbox to pick a date and that date will captured by that Textbox. This Calender can be easily attached to any ASP.NET Textbox to select a particular date. 

It provides client-side date-picking functionality with customizable date format and UI in a popup control. You can interact with the calendar by clicking on a day to set the date, or the "Today" link to set the current date.
 

CalendarExtender Properties : 

TargetControlID - The ID of the TextBox to extend with the calendar. 
Format - Format string used to display the selected date. 
PopupButtonID - The ID of a control to show the calendar popup when clicked. If this value is not set, the calendar will pop up when the textbox receives focus. 
PopupPosition - Indicates where the calendar popup should appear at the BottomLeft(default), BottomRight, TopLeft, TopRight, Left or Right of the TextBox. 
SelectedDate - Indicates the date the Calendar extender is initialized with. 
StartDate - Indicates start date for range that available for selection. 
EndDate - Indicates end date for range that available for selection.


In Microsoft Visual Studio, Go-to File -> New -> Website

aspx page code
Click on Image to Enlarge

Design view of source code:                                            

View in Browser:

Tuesday, October 25, 2011

How to use CascadingDropDown with ASP.NET AJAX and Webservice


In this Tutorial we are using AJAX Control Toolkit and Webservice to perform CascadingDropDown.The CascadingDropDown control in the AJAX Control Toolkit extends a DropDownList control so that changes in one DropDownList loads associated values in another DropDownList. Here we are using Three CascadingDropDown Extenders.

Attributes are following for CascadingDropDown extenders:

ServicePath: URL of a web service delivering the list entries
ServiceMethod: Web method delivering the list entries
TargetControlID: ID of the dropdown list
Category: Category information that is submitted to the web method when called
PromptText: Text displayed when asynchronously loading list data from the server
ParentControlID: (optional) parent dropdown list that triggers loading of the current list

Step 1:
MSVS2008->New->Website(CascadingddAj)

Step 2:
Add database to it. and create tables in database named it CarsMake, CarsModel, CarsColor


Step 3:
CarsMake Table:

CarsModel Table:

CarsColor Table:
Step 4:
default.aspx page code:
In order to activate the functionality of ASP.NET AJAX and the Control Toolkit, the ScriptManager control must be put anywhere on the page (but within the <body> element)
Click on Image to Enlarge
Step 5:
web.config page code:
Connection String added here with name ConnectionString. that is used in WebService.cs file in syntax {string strconnection= ConfigurationManager.ConnectionString ('ConnectionString").ConnectionString }
For this Example, we assume that the instance of the SQL Server 2005 Express Edition is called SQLEXPRESS and resides on the same machine as the web server; this is also the default setup. If your setup differs, you have to adapt the connection information for the database.
Click on Image to Enlarge
Step 6:
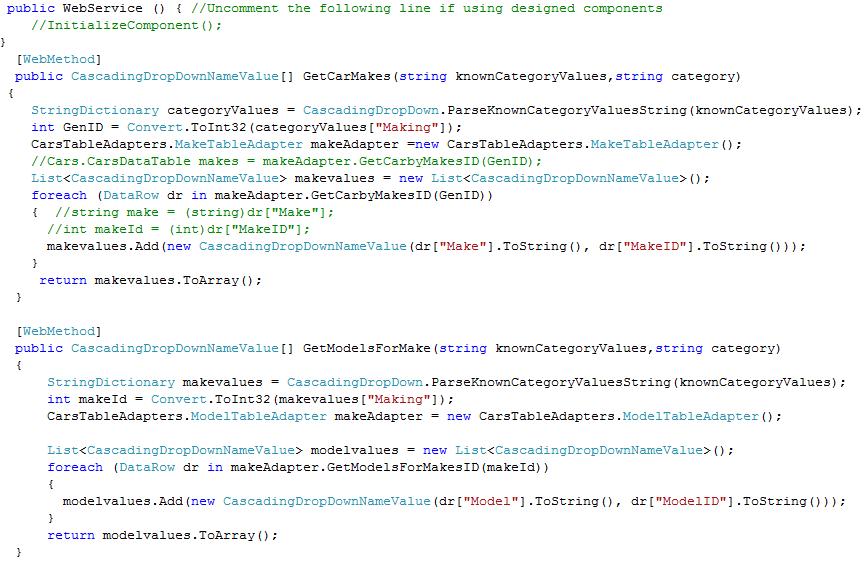
WebService.cs
(Click on Image to enlarge it)
The [ScriptService] attribute is used, otherwise ASP.NET AJAX cannot create the JavaScript proxy to access the web methods from client-side script code.
Click on Image to Enlarge
View in Browser 

Monday, October 24, 2011

How to work with CascadingDropDown using ASP.NET AJAX ,Webservice and XML Schema with DataSet Classes


In this Tutorial we are using AJAX Control Toolkit , Webservice and XML Schema With DataSet Classes to perform CascadingDropDown.The CascadingDropDown control in the AJAX Control Toolkit extends a DropDownList control so that changes in one DropDownList loads associated values in another DropDownList. Here we are using Three CascadingDropDown Extenders.

Attributes are following for CascadingDropDown extenders:

ServicePath: URL of a web service delivering the list entries
ServiceMethod: Web method delivering the list entries
TargetControlID: ID of the dropdown list
Category: Category information that is submitted to the web method when called
PromptText: Text displayed when asynchronously loading list data from the server
ParentControlID: (optional) parent dropdown list that triggers loading of the current list

ADO.NET typed datasets are classes that are generated from XML Schemas (.xsd file). As changes are made to the schema file the definition of the dataset class changes as well. When working with XML Schemas and typed dataset representations in Visual Studio at design time there is essentially no difference. They are both .xsd files in the XML Designer, the difference being that typed datasets have an associated class file and a predefined document (or root) node that represents the encompassing dataset.


Step 1:
MSVS2008->New->Website(validationControls)
Step2:
Add database to it and create table in database named it Cars.
Cars Table:

Step 3:
Right click over website name and click on Add New Item(WebService.asmx)

Step 4:
WebService.cs page code
(Click on Image to enlarge it)

Step 5:
Default.aspx page code
In order to activate the functionality of ASP.NET AJAX and the Control Toolkit, the ScriptManager control must be put anywhere on the page (but within the <body> element)
(Click on Image to enlarge it)

Step 6:
Right click over App_Code and click on Add New Item (DataSet.xsd)
give it to name Cars.xsd
Double click Cars.xsd
Right Click over opened space and select TableAdapter.
Step 7:
After clicking TableAdapter  this Wizard will open up 
Click on Next Button

Step 8:
Select use SQL statements by click on radio button.After that click on Next Button.

Step 9:
Enter particular SQl statement in this step. As i have used select sql command.
click on next button.

Step 10:
Uncheck Fill Data Table and give method name under return a DataTable(eg. GetCarbyMakesID)
click on next button.

Step 11:
This is a final window, click on Finish button.

Step 12:
By using same above process create other data table adapter.
You can reconfigure it by right clicking on already created methods and by selecting configure.

View in Browser:

Saturday, October 22, 2011

How to work with AsyncFileUpload using ASP.NET AJAX


In This Tutorial We are using AsyncFileUpload of AJAX Control Toolkit which is an ASP.NET AJAX Control that allows you asynchronously upload files to server. The file uploading results can be checked both in the server and client sides.


AsyncFileUpload Events, Properties and Methods


Events 
UploadedComplete : Fired on the server side when the file successfully uploaded 
UploadedFileError : Fired on the server side when the uloaded file is corrupted


Properties 
CompleteBackColor : The control's background color on upload complete. Default value - 'Lime'. 
ContentType : Gets the MIME content type of a file sent by a client. 
ErrorBackColor : The control's background color on upload error. Default value -'Red'. 
FileContent : Gets a Stream object that points to an uploaded file to prepare for reading the contents of the file. 
FileName : Gets the name of a file on a client to upload using the control. 
HasFile : Gets a bool value indicating whether the control contains a file. 
OnClientUploadComplete : The name of a javascript function executed in the client-side after the file successfully uploaded 
OnClientUploadError : The name of a javascript function executed in the client-side if the file uploading failed 
OnClientUploadStarted : The name of a javascript function executed in the client-side on the file uploading started 
PostedFile : Gets a HttpPostedFile object that provides access to the uploaded file. 
ThrobberID : ID of control that is shown while the file is uploading. 
UploaderStyle : The control's appearance style (Traditional, Modern). Default value - 'Traditional'. 
UploadingBackColor : The control's background color when uploading is in progress. Default value - 'White'. 
Width : The control's width (Unit). Default value - '355px'.


Methods
SaveAs(string filename) : Saves the contents of an uploaded file.


Default.aspx
(Click to enlarge Code in Image)


Default.aspx.cs
(Click to enlarge Code in Image)

Note: Try to Browse your code in Internet Explorer


View In browser:
As you can see different color every time.You can set color according to yourself, here i have set colors whose description is following.
There is no background color this shows we have not browse anything.

Uploading background color is blue at the time of file uploading

Uploading background color is green when file uploaded successfully.


Uploading background color is Red at the time of file uploading Error.


This is one of Throbbers. If you want to use different Throbber then Just Make a Search with Throbbers Keyword on Google search.
 
Throbber

Popular Posts